Showing posts with label siding. Show all posts

Friday, December 23, 2011

A House in 22 days - Day 13 - Christmas Eve Eve

 The elves are thoroughly whipped and the house is thoroughly done!  The house wasn't quite 22 days, we actually did it in 13... with an average of 10 hours per day... each... so 260 hours all said and done.  I feel like I've run the Boston marathon!

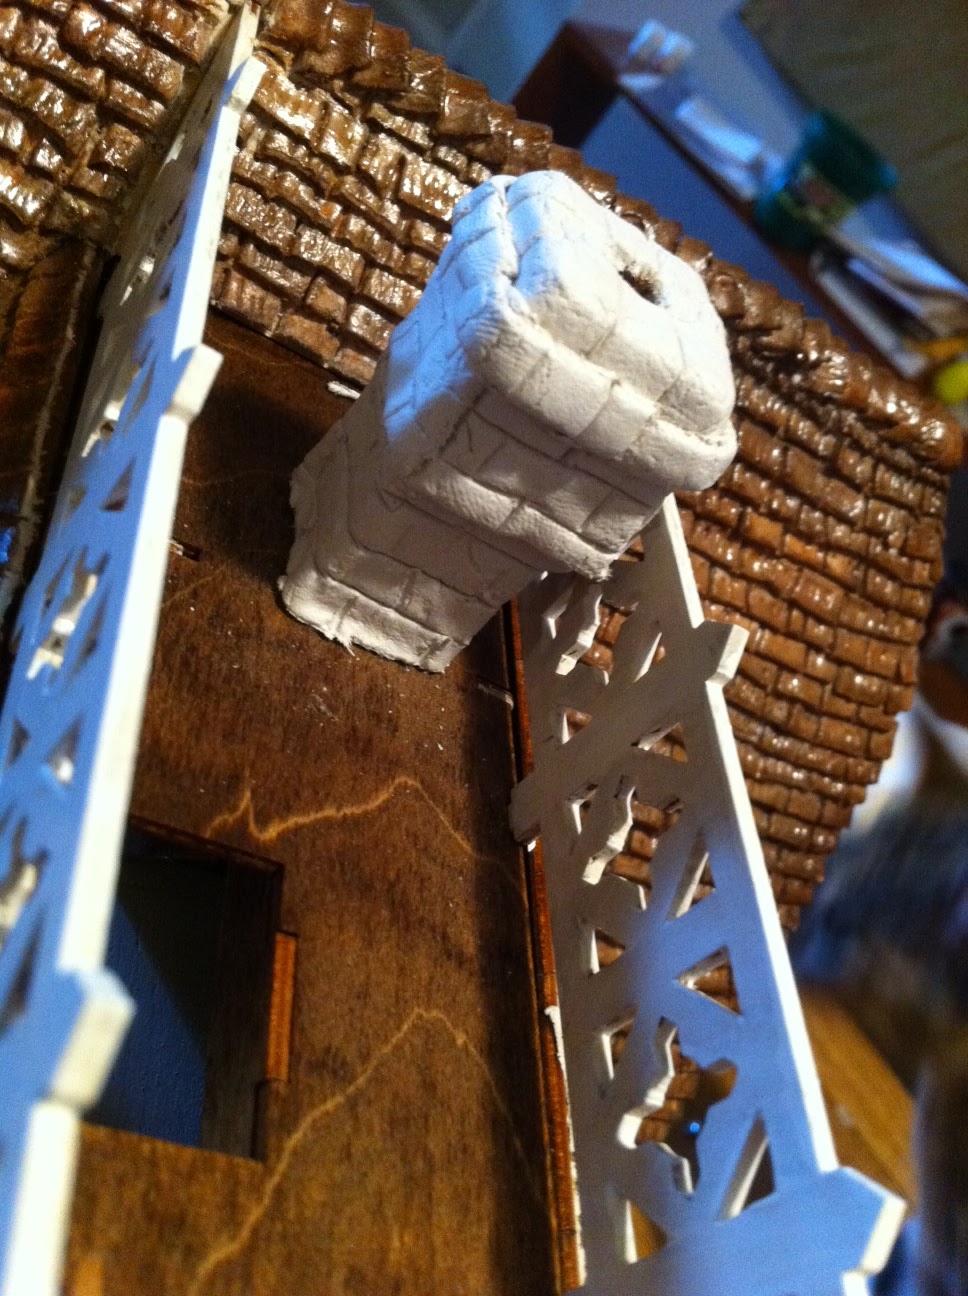
The final trim bits have been glued in place, the paperclay is done on the chimney, and the cap is on (not pictured).  Ben and I came close to killing each other only once during the whole process which is pretty damn good if I do say so myself.

Things I would have done differently on this build - more time.  I hate a rush build, I like to agonize over placement of everything, this is a hobby that definitely appeals to my OCD tendencies.  I would have used a saw to cut the siding rather than a utility knife to get cleaner edges, and I would have added plexi glass to the sunroom rather than the GL plastic window.  I definitely wish we had taken the few extra hours to electrify the house.  I wouldn't use the wooden shingles again, I would go with paper clay and simulated the terra cotta shngles.


 Things I love about this house, I love the front entrance bash.  As much as some light was lost taking out the floor to ceiling windows I think the functioning doors and steps / planters more than make up for it.  The pink is growing on me, at first I really hated it but as everything came together I think it actually suits the house pretty well.

I really like the lay out of the kit, it's different than your standard four room box, I'm quite pleased with the stairway and we're already planning on getting some appliances for a kitchen set and finding a smaller dining room table for the "dining hall" (blue room).

I will actually be sad to see this house go in spite of my aggression towards it earlier today when I thought it might not be done in time for christmas :)


Wednesday, December 21, 2011

A House in 22 days - Day 10 & 11

Day 10 was siding and stonework.  Ben tackled the MDF siding boards while I slaved away at the pasta machine.  After the clay was secured to the wall I wet it down and scrubbed the pieces of clay together.  The slick surface is easier to work with I find - and often spritz it with a plant mister to keep things moist.  The lines were pressed in with the lever on a set of nail clippers, and then the wet clay drug back up over to create raised edges / texture.

The MDF siding appears to be extremely difficult to cut, I have to say I'm quite glad i'm not working with it :)


 The sunroom tip out has been a quandary - I really didn't know how to approach this one.  I had cut out a room sized rectangle of foamcore and was prepared to do the floor on this to keep it all on one level.  This involved bringing the paper clay foundation up higher however as the foamcore was visible through the windows.  In the end I used the foamcore as a pattern for a lino tile.  I then finished off the ledge between rooms with thin slices of lino tile.


The paper clay foundation was then ready to go on, I really like the look it gives to the sunroom, it makes it look more substantial!


The paper clay stone work which went on in day 10 was painted today with layers of watercolour paints.  I filled in the lines between the stones first and then applied different layers of yellow, brown, and grey over top.

 The next segment of paper clay to be done is the front entrance.  I have glued together the planters which came with the kit (pardon the tape) - the plan is to paperclay the planters and steps into one piece which can then be glued to the deck

I really wish we had electrified this house, I think it would be one of the neater ones to see lit up!  With 2 days to go until christmas, I'm beginning to think we just may make it (as you can see the roof is going up currently)

Monday, October 3, 2011

Glencroft - Day 14

Well the move is finally over and the boxes are rapidly approaching "unpacked".  I even have the place to myself tonight so I dove head first into the miniature land and worked on my Glencroft with fervor for the first time in weeks.

I had been debating the idea of making larger, oriel windows in the smaller main floor room of the house because I want to use it as a dining room.  With a sample dining set in there the windows are far too high for the room to function at all in this capacity.  I had been debating building a larger window before I got the kit, and this approach is far out of my comfort zone, but I knew I wouldn't be happy with the finished product if I didn't try.

The trusty dremel eventually made it through the wood and I ripped the window opening on the right hand side down an additional two inches, and thus became committed to figuring out how to build windows from scratch.  Tonight I started building the oriel casement but soon realized that it was a bit much to take on considering I have no idea how to build scratch windows.  Instead I am building a cantilevered window with a tall exterior casing.  I want to add carving detail to the upper "cabinet" of the structure, or possibly just stucco the upper portion and frame it in Jacobean stained wood.

I am happy with the results so far, it's really opened up the room.  I briefly toyed with expanding the front window slot to allow for two smaller windows to be installed to centre them more from the interior.  It may still happen, nothing has been ruled out yet :)


I then wanted to feel like I got something done so I started on the stucco for the outside of the house.  I knew I didn't want to use the spackle and paint method because of the small spaces between the 2nd floor brackets, plus I find the texture is too "big" for this scale I'm working in.  I went with the toilet paper stucco approach and I think it's pretty bang on - not to mention easy!


.

Monday, August 22, 2011

Chantilly - Day 23

I finally have the chimney bricked and managed to get the rail to stay glued using a prop stick and lots of tape.

The chimney needs some crack fill looking at it this morning, and I need to sand out the fingerprint ridges, but overall I'm quite pleased with it.  I think the brickwork will be red brick.


Saturday, August 13, 2011

Chantilly - Day 21

Tonight the kitten was sleeping so I was able to spend some time on the house again - I will pay for this solitude at approximately 6am when she decides it's time to be played with again.

I finished off the siding in the 2nd storey eaves, put another coat of enamel on the porch posts and added board roofing to the porch.  I knew I didn't want dark stain on the roof but didn't really want to go with the the lighter stain or paint either - the solution, mix the stains and see what happens.

At this point all I have left to do is permanently install the fireplace, finish painting the dining room set, a few more coats of enamel on the trimwork/posts and finish the porch foundation (lost a piece to the kitten, will have to make a new one) and this thing is ready to go into a box!  Just in time for the move, I couldn't have timed it better.

I am still debating putting boards on the porch floor, but that would involve altering the door and I'm fairly certain it's not moving any time soon.  I guess the doors aren't hinged so they could be built up around and it wouldn't cause any further mechanical issues... but I'm too tired to make that decision tonight.


Tuesday, August 2, 2011

Chantilly - Day 20

The day 20 post had to wait until the glue dried and the tape could come off!  I finally got the posts and trim painted and installed, along with the door!This house is almost ready to go in to a box for moving!!

I had to trim the side pieces to accommodate the siding (next house will have a complete dry fit with pencil markings).  The door was enameled and has 1/2 scale doorknobs glued on.

Monday, August 1, 2011

Chantilly - Day 19

Today was white day.  I've been working on the dining set for a couple of days now and finally I'm getting the enamel to cover the mahogany colour it once was.  I don't want the dining room to get dark and claustrophobic, and with that very dark floor the furniture was just way too dark.  This modelling enamel is amazing stuff but white in any media is difficult to work with.

To top it all off, I'm down to the trim on the house.  I started building the second layer of the window frames this evening, and got three coats of white on all the porch rails, eaves trim, door, and post trim.  I added another piece of dark trimming to the back of the house to neaten up the appearance from the back and started on the final mouldings for the two upstairs rooms.  It was much much easier to apply mouldings as I was building - note for the next project.

In this box of surprises I was delighted to find some doorway hinges, so I think I will be able to get a functioning doorway on this house, that would excite me greatly!

Saturday, July 30, 2011

Chantilly - Day 18

Friday night siding marathon - that's about what I did while laundry was going.  I have all the siding on aside from 1/3 of the right side of the structure, which will be tackled tomorrow once the paint on the strips dry.  I have to say, siding on this house is so very, very persnickity.  But should anyone else be working on it, the angle of the gables is 120 degrees - get a handy dandy cutter and it will make your life much, much easier!

Thursday, July 28, 2011

Chantilly - Day 17

For varying reasons I had ample time to work on siding tonight.  I'm so glad I painted the strips before installing them, it's making it much easier to complete this than if I had to go back and try to do these tiny tiny pieces of siding with a seemingly mammoth brush.  Coincidentally, I want a Paint Zoom (was watching infomercials while working on the siding lol).

Anyway, I got some more siding installed, progress pictures below, total work time today was only four hours - still it's pretty good progress considering I forgot to take my clay out of the freezer!

Wednesday, July 27, 2011

Chantilly - Day 16

Siding is no longer new and exciting, in fact I'm still a bit disheartened by the window framing fiasco.  I did manage to get a bit more on this evening but it got rather persnickity up around the eaves.  I then decided to frame out around the central upstairs window.  On the bay window and inside this frame I will make scalloped shingles out of clay and paint them the same colour as the clapboard.  It won't be obnoxious but will still add some textural diversity to the house and pay homage to the high victorian siding styles found on older farmhouses along the coast.

However I soon tired of this as well and decided to do some more work on the shingles.  The watercolours have  firmly set and the shingles are now quite dry, so I added a coat of pecan stain to even out the tones a bit and saturate the cracks between shingles.  It's given the shingles a bit of warmth and has toned that blue/purple tinge out of them quite nicely.

The stain was applied heavily with a sponge brush.  I started in the corners and worked my way out (the idea to have darker shingles where moisture would tend to collect, lighter where the roof would be baked by the sun).  I'm debating adding moss to the shingles with my oil paints and a stiff brush.  It could either be really great or really not... I may need to make a practice roof :)

Tuesday, July 26, 2011

Chantilly - Day 15

Disaster!  It appears my measurements were ever so slightly off and the window frames aren't thick enough to cover the edges of the siding!!

After siding the lower half of the side wall it's painfully apparent that the frames should have had a subframe built.  Now I have to figure out some what to make window frames to go over the window frames and somehow have it still look decent.  I sense a lot of carefuly snipping in my future... oh so careful snipping.  Maybe the siding should be removed and a clay exterior constructed, or perhaps a flat board siding.

I was so pleased with the little window sills too, I think that's the true salt in the wound.  Especially after spending hours coating these things with layer after layer of white paint and then enamel!


 I know it's not ruined, I just need to figure out a plan so that I can continue on with confidence... to the doll house forum!

http://www.greenleafdollhouses.com/forum/index.php?

Monday, July 25, 2011

Chantilly - Day 14

When I got home I found that, to my dismay, the wood glue actually had done all promised and securely fastened the bay window walls to the ceiling of the veranda.  Pull and pry as I may, those walls weren't going anywhere.  Thankfully, I am the owner of a dremel!

I sanded the tabs off the bottom pieces and used this supreme wood glue to secure the walls to the flooring installed earlier and the floor piece.  A few taps with Thor and the veranda secured to the front of the structure quite nicely and was then secured with tape.. lots and lots of tape... and books... lots and lots of big heavy books.

I have also installed the rest of the framing on the corners of the house and have my first coat of paint on the siding strips.  A few coats of white paint prior to the siding install and I will be well on my way to the next phase - landscaping.

The dining room set I had ordered earlier arrived today, I forgot I had gotten one in a mahogany finish, I was sure I ordered it in white to compliment the dining room trim / paper.  This week I will have to run up to PM Hobbycraft and pick up some white enamel to correct this gross error in furniture judgement.  Otherwise I'm quite pleased with it - I hadn't gotten the tip that 1/24 scale furniture was a bit tricker to buy because of the difference in scale between manufacturers but so far everything appears to be golden.


I wanted to see how difficult installing this siding would be and ensure that my corner caps were deep enough to accommodate the siding, so I did the installation on the back side of the house rather than futz around with the windows tonight.  It went much faster than the shingling, so I'm pretty much tickled pink!